Monday 27 June 2011

A Rivetting Experience!

Hi, All.

...and the rivet-count keeps climbing...
Ever had one of those projects that just seems to go on and on, taking up your time, materials and patience, while never seeming to progress? Well, guess what...?

It's been over a week since my last post and things are progressing on the HMSW Gargantua project very, very S L O W L Y...

Don't get me wrong. I'm happy with the results so far, but I have rarely undertaken a project that required so much forward planning. This week's efforts have been concentrated on the head of the beast - a part which I had previously thought I might leave until much later. Meanwhile, the legs remain on the drawing board - I won't know exactly how I want them to look until the boday and head are complete...

Internal bulkheads, doors, ladder and trapdoor had to be completed early.

The internal elements of the head had to be designed, built, painted and glued in place before the head itself could be constructed. Details such as navigational equipment will be added much later, but structural elements such as trapdoors, doors and ladders had to be finished first. This took a lot of designing, building and rebuilding. Much time was spent just staring at little bits of plastic and forcing myself to keep going...

The rear of the head, as seen from the body, with a view through to the 'mouth'...

I won't continue to ramble on about how long this is all taking, but if you've ever inflicted this kind of thing on yourself, well - you understand...
 
Four mighty pistons link the head to the body. Steps from the main deck will eventually link to the rear door of the head via a swing-bridge...

The pistons which link the body to the head are firmly anchored far back inside the body, so that they can take a lot of weight. A lot of strength is essential - there may be the added weight of three or four miniatures inside the head, not to mention getting the occasional knock, and damage may be impossible to repair once the body is closed in. For this reason, I have taken my time and made sure things are well supported inside. As with any project, it is not worth taking short-cuts during the initial stages. Everything else could fall apart if the foundations are weak...

So there you have it for now. I suppose the Victorians didn't work very fast when they were building steam-powered monsters, either.
Rivet-count so far: 865! And I haven't even detailed the outside of the head yet, let alone the body or legs! 

In other news:

Cute, isn't he.
 Mid-week, I received a welcome distraction from plastic rivets and the smell of poly-cement. A package arrived from The War Store with some new crocs to add to my HOTT lizard army. As a means of keeping myself sane, I have decided to do just one at a time, in between working on the walker.

First up: the Blackhide Wrastler from Hordes Mercenaries/Privateer Press. This dude is BIG! And so cool...
Too cool, in fact. He'd be wasted if I just kept him for HOTT - let's face it. I mean, wouldn't he just be perfect as the creation of a mad Victorian scientist? I've decided to base him on a small  (only 50mm square!) base, then insert that into a larger base for HOTT. More bang for my buck! Let's see what those intrepid explorers make of this wee beastie!


Anyway, hope you like the paint-job.

More soon - I'm going back to my rivets and a nice glass of pinot noir!

All the Best!

Sunday 19 June 2011

Full Steam Ahead!

Hi, All.

I never, ever want to do this again!
As you can see from the above picture, the engine for HMSW Gargantua is now complete!

It has taken me many hours of work today (about twelve, I think - I lost track!) to complete the detailing and painting, but I think it's worth it...

Front and rear shots, without the flywheel.

Close-ups of the furnace and boiler. Intimidating, huh?

The design hasn't changed much since I posted my first pictures. the biggest changes have been to make the smoke-stack slightly shorter and bulkier, and the addition of a much more impressive furnace.

Calligraphy not being my strong-suit, I haven't summoned the courage to do this bit yet...

The boiler now has a brass scrollwork-plate, onto which I plan to inscribe the name of the greatest industrial city of the Victorian Era... A place very close to my heart. After all, Sheffield made 90% of the world's steel at this time... But hand-painting "Sheffield" might be a bit much - we'll have to see. If I can't do it justice, I'll have to come up with something else.

Engine and flywheel, together at last!

Lieutenant Boddington tries to keep his excitement firmly in check behind his stiff upper lip.

I decided to change the plans from the original long-and-sleek 'battleship' configuration to something a bit more bulky and brutish. So, the flywheel will now be mounted next to the engine, rather than behind it. This will reduce the length of the model considerably, but she'll still be huge!

Big, isn't it?

So far, so good. Now, for those of you who are wondering, there are One-Hundred and Thirty-Four rivets on the engine assembly, all cut and glued by hand. Combined with the flywheel, that makes Four-Hundred and Seventy so far!

Anyway, I can't stay here, blogging away! I've got LEGS to build!

More soon.

All the best!

Friday 17 June 2011

Free Wheelin'!

Hi, All.

In today's update, I am pleased to announce some progress! After a week of planning, cutting, scrapping, heavy drinking and a fair bit of colourful language, the final incarnation of the flywheel for HMSW Gargantua is complete!

Lieutenant Boddington nurses a sore shoulder after attempting to roll the gargantuan thing unaided. But no one's laughing now...

This wheel is slightly smaller than originally intended (80mm diameter instead of 100mm) but I'm very happy with the results.


The outer rim is a roll of masking tape, peeled back to the desired thickness. (Don't worry - I kept the tape for re-use, wrapped around a plastic hair-gel pot.). The inner hubs are press-studs for denim jeans. Everything else is plastic board and rod.


Needless to say, the rivets took quite a while - each was cut from a plastic rod and glued in place by hand. There are 144 x 1.6mm rivets and 192 x 1mm rivets - a total of 336! And this is just the flywheel...

Anyway, that's all you get for now. I've got a couple of days off soon - I plan to finish the engine and start on the legs.

Watch this space!

All the best!

Thursday 16 June 2011

The Colonel's Secret Recipe - Revealed!

Hi all.

Nothing much to show tonight so far - the walker continues to develop, but has now been through about five incarnations! Flywheel's looking great. Engine's been remodelled. Basically, a lot of work but not much to show - yet. Keep watching this space!

In the meantime, Sky has asked me:
"While we are waiting I was wondering two things. Would you share the ground cover recipe? Also what do you do when a player wants to chase some varmint into the saloon? All your buildings are solid."


OK - These are good questions.

I made the decision to model Leadwood without removable roofs because in all the games we played, characters entered a building maybe once or twice - which I did not feel justified having twenty-three loose roofs.

Removable roofs would be harder to store without incurring damage, and just like all other aspects, the more you can glue down, the stronger the model will be and the more detail you can achieve.

Additionally, lifting the lid off a building to show a black box inside would kill the illusion. Short of detailing the insides of every building and making all windows transparent (in which case, I doubt I would ever have finished the model!) I couldn't see any real benefit. This was meant to be a WOW! model, after all.

As far as Notorious Greg and I are concerned, running into buildings is for cowards, and there are enough nooks and crannies in Leadwood for some serious gunfight action as it is. If anyone does enter a building (rare, as I said) we simply remove the character from the board and make a note. Using The Rules With No Name, each player probably has only about five models - it's not hard to remember who is where.

We haven't yet had a "two guys in the same room" situation.

As for my recipe for ground texture (or goop):
  • One part paint
  • Three parts PVA
  • One part water
  • Half a part of coarse sand
  • Four parts plaster of paris
  • I use a test pot of paint as a 'part' - this makes quite a lot of goop, so I keep it in a plastic pot with a screw-on lid.
  • For Leadwood I used the above recipe, with Resenes "Kalgoorie Sands" as the paint colour. When dry, I then washed the ground with watered-down walnut woodstain and drybrushed with Resenes "Just Right." It may be worth giving your board an undercoat of your basic paint colour first. Also, pick out plaster 'lumps' if they occur where you don't want them. This recipe gives a very rough texture, so remember that if you are using separate scenic pieces, they may not sit flat on the table if you've spread it too thickly. 
  • Boulders, etc, were made using Das terraotta clay, sculpted with my fingers and smoothed with PVA. These were heavily highlighted with "Just Right."
  • Finally, I used three shades of Woodland Scenics static grass - Dark Green, Light Green and Harvest Gold. Applying these in small patches, from dark to light, resulted in a very dry-looking environment. Most of the buildings have 'weeds' and so on at their edges and tucked under the boardwalks.
Hope this answers your questions!

More soon.

Sunday 12 June 2011

Huge Walker - Construction Begins!

Sergeant Tetley oversees the construction of the devilish new engine and flywheel!
Hi, all.
I've been threatening it for a while and now it has begun! I've sent most of today building the engine and flywheel that will be the main features of my new Walking Landship, the HMSW Gargantua.

The boiler and stack start to take shape, and a rough concept for the flywheel is inserted for reference.
This collossus will eventually be about 45cm long, and stand somewhere around 30-35cm high from her dainty little tippy-toes to the top of her chimney. At this stage, I plan for her to incorporate a gun-deck, head-mounted gatling and a number of other details I won't reveal just yet.

The flywheel is constructed from plastic board and washers. This was a serious pain to do - and I haven't even started on the rivets yet!
So far, she is constructed of foamcore board, cardboard, plasticard rod and sheet, a vivid marger, washers, garden irrigation bits, greenstuff, PVA, superglue, Ados F2 adhesive, and the basic building-block of all model-making equipment everywhere: a toilet-roll inner.
Close-ups as the details start to go on the engine. A furnace is added to the front.
 I'll keep you updated as my monster grows!
Viewed from above. The deck (black board at the moment but soon to be planking) is 30cm long. A neck and head will be added later.

All the best!

Thursday 9 June 2011

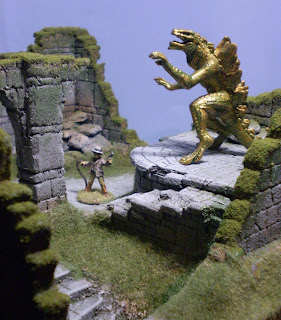
A Ruin Re-Ruined...

Hi all.

As a part of my re-born craze for Steampunk/VSF, I've spent a little bit of time recently resurrecting some bits and pieces.
All my 1880s British Redcoats have been rebased, along with  number of characters, chinese bandits and two yetis. The cavemen that were previously doomed to become slaves in my Crocodile army have been liberated to indulge themselves in a life of B-Movie grunting and terrorising helpless maidens on the jungles of the moon, and I now have a REASON to build lots and lots of oddball machines!

But most of my time for the last couple of nights has been spent resurrecting the ruins I have used from time to time in pics, and little else. These were built ages ago out of foamcore as three stand-alone pieces, but have now been glued down to a board for my new modular all-scales table (more on that later). A bit of paving, a collapsed staircase, a puddle and some grass, et voila! This place is just waiting for a helpless maiden, some priceless artifacts and a nazi spy or six!


Hope you like it. More soon.

All the best!

Sunday 5 June 2011

Up and at 'em, Lads!

Hi all!

In keeping with my recent thoughts on VSF, I have been devouring the GASLIGHT rules, dusting off my redcoats and adventurers and cleaning up a few devilishly cunning Chinese and other types...
"They've 'ad a bit of time off, Sir, but the lads is keen as mustard to get back into action!"

Plans for a new walker continue to fill my sketch book, my scratch-built sci-fi tank is in danger of being converted to steam-power, and a tracked Rolls-Royce idea I was working on a year or two back has resurfaced...

Not much eye-candy tonight I'm afraid chaps, but I thought I'd throw in a little song I rather like. Found this ages ago but it fits quite nicely, I think you'll agree...

Cup of Brown Joy

Tally ho!

Friday 3 June 2011

Steampunky happiness!

Hi all.
My steam boat - built some time ago. Sorry about the photo quality!

Not much going on as far as making stuff goes this week, but I am happy to report that I have bought a copy of the GASLIGHT compendium... VSF at its best!
The English army... They've been desperate for something to do for such a long time!

So: not only is the new walker taking shape, but all those old colonial and adventurer miniatures that have been gathering dust are about to be reborn! Yes! Reborn, I tell you! Ahahahahaha!!.....

 um. sorry.

Anyway, more to come soon.

All the best!